This page contains frequently asked questions related to course administration with specific emphasis on Canvas and SeatGEN. For basic training on Canvas, please visit Getting Started with CourseWorks (Canvas) for Faculty. This page will be updated regularly.
Topics (click to navigate to a section):
Course Shells
How and when are Canvas course shells created?
Canvas course shells are created by a feed which is managed by CUIT and uses enrollment records from the Office of Academic Records and Registration (OARR). The rough timeline for the creation of course shells is as follows:
- Fall courses - mid-June
- Spring courses - late October
- Summer courses - early March
Why are some course shells merged?
If a professor is teaching multiple sections of a course, by default the course shells will be merged (sometimes referred to as “parent” and “child” shells). This allows the instructor and designer to create content within the parent course and assign it to specific sections, eliminating the need to create duplicate content within separate course shells.
The below image shows what parent and child shells look like when searching the list of CBS courses in Canvas.
- The parent shell contains the instructor’s name in the “Teacher” column.
- The child shell contains no instructor’s name in the “Teacher” column but contains the instructor’s name within the course title.
- The parent shell contains all students for all of the instructor’s sections of the course. The child shell shows zero enrolled students.
- The parent shell will be published. The child shell will not.

If you click on the child shell to open it and click on the People tab, it should be empty. When you open the People tab in the parent course shell, everyone (instructor, students, TAs, designers) is listed there. The instructor is enrolled in all relevant sections of the course; the sections are listed next to their SIS ID, as shown below:

All of the students will be listed in the parent shell and they’ll be enrolled in the appropriate course section and not any other section. The section is listed next to their SIS ID, as shown below:

How do I enroll myself as a designer in a course with “parent” and “child” sections?
You may enroll yourself as a designer in a single section within the parent shell and access most items you need without trouble. However, if you need to access all sections in SeatGEN, you must enroll yourself in each section of the course within the “parent” course shell.
Warning: Do not enroll anyone in the empty “child” shell. This breaks the enrollment feed and may cause students to be enrolled in the empty child shell and they won't have access to the course materials.
To enroll yourself in multiple sections:
Open the parent course shell.
Go to the People tab. Click "+ People".
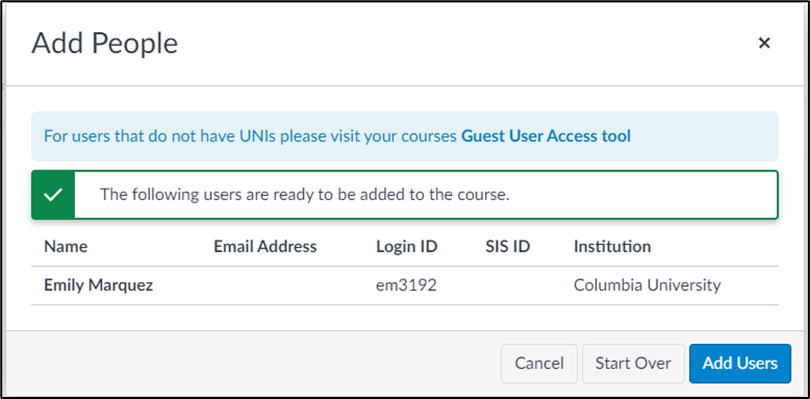
Enter your UNI, select "Designer" from the Role drop down menu, and select one course section from the drop down menu, as shown below:
Click "Next" then “Add Users”.
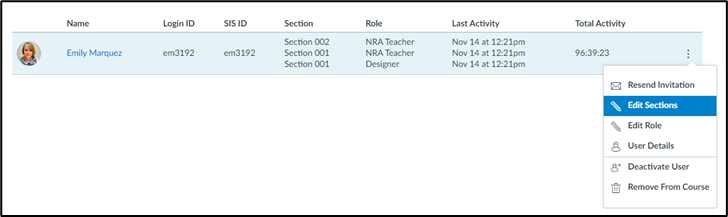
Then repeat the above steps to enroll yourself in the other sections or click “Edit Sections” as shown here:
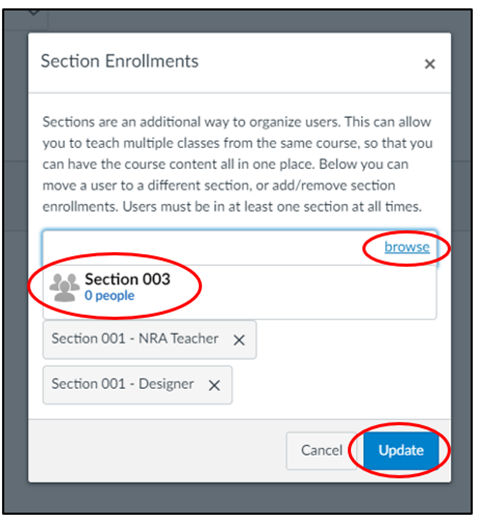
After clicking "Edit Sections", click “browse” and select all relevant sections. Then click “Update”:

How do you unmerge “parent” and “child” course shells?
If a professor teaches multiple sections of a course and prefers to construct separate Canvas courses for each section, please email [email protected] to request the courses to be unmerged. Be sure to provide the URLs for the specific course shells (parent and child(ren)).
Course Construction
When should a Canvas course be finalized before each term?
There’s no official policy; however, we recommend that the course be constructed and finalized 2+ weeks before the first class session.
How do I import content from one course into another?
For courses that have been taught previously and much of the content remains the same, course content can be imported from a previous Canvas course into the new (empty) course shells. You can import all content or select specific items or groups of items such as assignments and quizzes.
How to import content from one course into another.
How to shift the calendar event dates forward and change days of the week.
You can also copy a single item, such as an assignment or quiz, from one course into another (rather than importing).
WARNING: importing the same content multiple times may result in information being overwritten.
How should I structure my Canvas course?
Use this Canvas Course Checklist to make sure all essential components are included in your course and the settings are properly configured. Use the CBS Syllabus Template to ensure accuracy and consistency across all courses. For Core courses, division staff should use the DesignPLUS template to build the syllabus on the instructor’s homepage.
My course is published but why can’t my students access it?
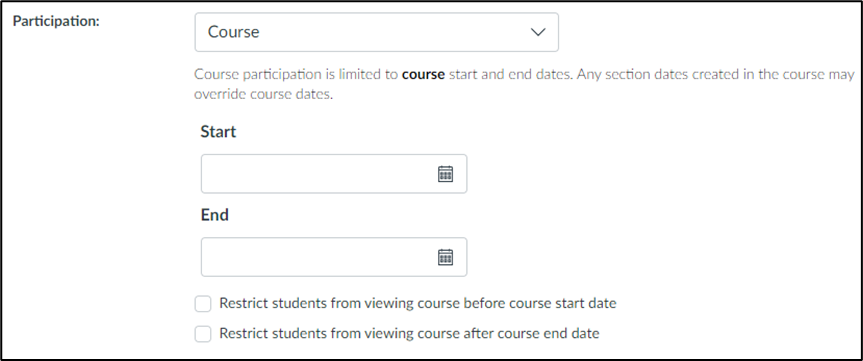
Review the Course Settings (click “Settings” in course navigation menu; shown in below image). Course participation is limited to course start and end dates. If “Restrict students from viewing course before course start date” is checked, students can’t view anything in the course before the start date. If unchecked, students can view the published course before the start date but can’t participate in any assignments, discussions, quizzes, etc.
If “Restrict students from viewing course after course end date” is unchecked, students can view the course after the end date but can’t participate.
If the course is not published, students cannot access it.
How do I add or edit the Professor Bio on the home/syllabus page? Why don't the session times and location appear here?
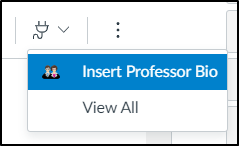
Use the "Insert Professor Bio" plugin to insert the professor's name, headshot, and contact information on the home/syllabus page in Canvas. While in editing mode, click the "Apps" icon and select "Insert Professor Bio" from the dropdown menu (shown below).
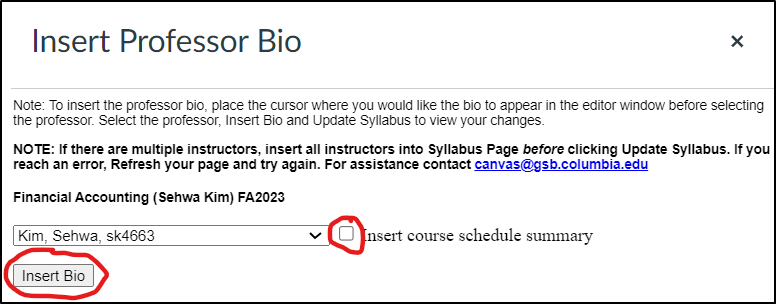
In the pop-up window, ensure the professor's name is selected from the drop-down. If there are multiple instructors, insert each instructor's bio into the Syllabus page before clicking "Update Syllabus". Check the box "Insert course schedule summary" to include the schedule and location for each course section. Then click "Insert Bio" (shown below).
The bio will look similar to this:

Where is the Core Excused Absence Form? What do I do with it?
New in Fall 2025: Both MBA and EMBA Core Excused Absence forms are now Qualtrics forms. The links will not change. The MBA form is no longer a Canvas quiz. When constructing your Canvas course, remember to delete any Quizzes entitled "Core Excused Absence Form" and remove any associated links.
Follow instructions in the CBS Syllabus Template to include the appropriate attendance policy links in the course syllabus/Canvas home page.
MBA Core faculty will receive an email from Brandon Manning in OSA at the end of each semester with the list of students who have excused absences. If faculty want an update prior to the end of the semester or if they have questions about a specific student, they can reach out to Brandon Manning.
Is it possible to use both Proctorio and Turnitin in a Quiz/Assignment?
No - Proctorio is an option in Quizzes (not Assignments). Turnitin is an option for Assignments with "file upload" or "text entry" submissions only (not Quizzes). If a professor wants to use both of these tools, they would create both a quiz and an assignment and require students to submit both. For example, if a quiz includes various question types (multiple choice, true/false, essay, file upload), the professor may create a quiz that has the multiple choice and true/false type-questions, and an assignment that has the essay and file upload type-questions. Proctorio can be enabled in the quiz and Turnitin can be enabled in the assignment.
Canvas Roles
What are the various Canvas roles used for?
Teacher: This is the official instructor of the course. Professors are enrolled as Teacher via OARR's enrollment feed. They cannot be enrolled manually.
NRA Teacher: used for professors who are not teaching the course but need access to the course. The Designer or Teacher may manually enroll faculty as NRA Teacher.
- Do not enroll a professor as NRA Professor if they are the official instructor of the course; instead, they must be enrolled via OARR's enrollment feed.
- Some reasons for using the NRA Teacher role are: they're a new professor and need to refer back to previous terms to prepare to teach; they're an experienced professor serving as a mentor to another professor; or they're teaching different sections of the same course and working together to ensure consistency in curriculum across sections.
Enhanced TA: used for all TAs who are not simultaneously enrolled as students in the course. Allows the TA to create/edit/grade assignments and quizzes. The Designer or Teacher manually enrolls the Enhanced TA in the course.
TA: used for TAs who are simultaneously enrolled as students in the course (this should be rare - see Hiring and Utilizing TAs). The TA role does not allow access to create or edit assignments and quizzes, nor access student submissions and grades. There is no Canvas role which would allow the TA to create assignments or to see which students submitted an assignment, but restrict access to the rest of the information and functionality. The Designer or Teacher manually enrolls the TA in the course.
Student: This is the role of all students registered in the course. They are enrolled in the Canvas course via OARR's enrollment feed. They cannot be enrolled manually.
NRA Student: Do not enroll anyone as NRA Student in any official courses. This role is used for non-credit-bearing courses, such as Samberg's training courses, which don't require registration through OARR. This role is assigned manually.
CBS Student: Used only in case of emergency; if a student is officially enrolled through OARR's registration process and needs access to the Canvas course today (and can't wait until 1-2 days after registering), the Designer or Teacher may manually enroll the student as CBS Student. The enrollment script will change their role from CBS Student to Student. Do not enroll a CBS Student unless you have confirmed they've completed the official registration process through OARR.
Participating Observer: If a student was approved to audit a course, the Designer or Teacher may enroll them as a Participating Observer using their UNI. This grants the same access to Canvas as the Student role but identifies them as an auditor. Do not enroll them via the guest user tool. Refer to OARR's Auditing page for more info.
Designer: the divisional staff enroll themselves as Designer in the courses they're assigned to support. If the course has multiple sections, refer to "How do I enroll myself as a designer in a course with “parent” and “child” sections?" above.
Faculty Assistant: This role is rarely used and perhaps may be obsolete. It is similar to the Teacher role, with some restrictions. Most notably they can add only NRA Students, CBS Students, and Participating Observers to the Canvas course.
Observer: This role is not used at CBS. Do not enroll anyone as an Observer. Outside of CBS, it is commonly used to allow parents or guests view-only access to the course (with some restrictions).
Gradebook
When can students see their grades?
In the Gradebook, the Grade Posting Policy controls when grades are posted (visible to students). The default setting is grades are posted automatically. This means assignment and quiz grades are visible to students immediately when entered in the gradebook. It’s strongly recommended that you change it to “manual” before the course begins, unless the professor prefers for grades to be immediately posted.
You may adjust the grade posting policy for individual assignments (for example, a professor wants to share feedback immediately with students for a concept check quiz).
Note: if a student fails to complete a feedback form for a course, their final grade will be suppressed until the term’s grading period concludes, typically three weeks after the final class session for a given term (A/B/Full). Read more about course evals here.
Groups / Learning Teams
How are Learning Teams created in Canvas?
Learning Teams are automatically created in the People tab within Core courses. If students are enrolled in the Core course but there aren’t groups of Learning Teams in the People tab, Rachel Horton in the Dean's Office can correct this by ensuring the “core moniker” is added to the course in Coursedog.
Alternatively, you may obtain the list of Learning Teams from OSA/EMBA and import the groups using a .CSV template. If there’s a “Learning Teams” group set/tab but students haven’t been assigned to learning teams, click “Learning Teams” then “+ Import” (shown below) and follow the instructions in the link above.

How can I create groups in Canvas for group assignments?
For group assignments, students must be assigned to groups before they submit the assignment. There are multiple ways to create groups:
SeatGEN
Why don't I see a course in SeatGEN?
If you have access to SeatGEN but do not see a specific course or section in the SeatGEN home page, make sure you are enrolled as a designer in that Canvas course (including all applicable sections of the course). It may take up to 24 hours for the course to appear in your SeatGEN account.
If the Canvas course shells were just recently created for the upcoming term, it may be a few weeks before the sections are generated in SeatGEN. This process is separate from the creation of the Canvas course shells and relies on OARR's registration timelines. OARR works with CUIT to complete both processes - creating Canvas course shells and SeatGEN course sections.
Why don't I see options to generate a seating chart or reports for a course in SeatGEN?
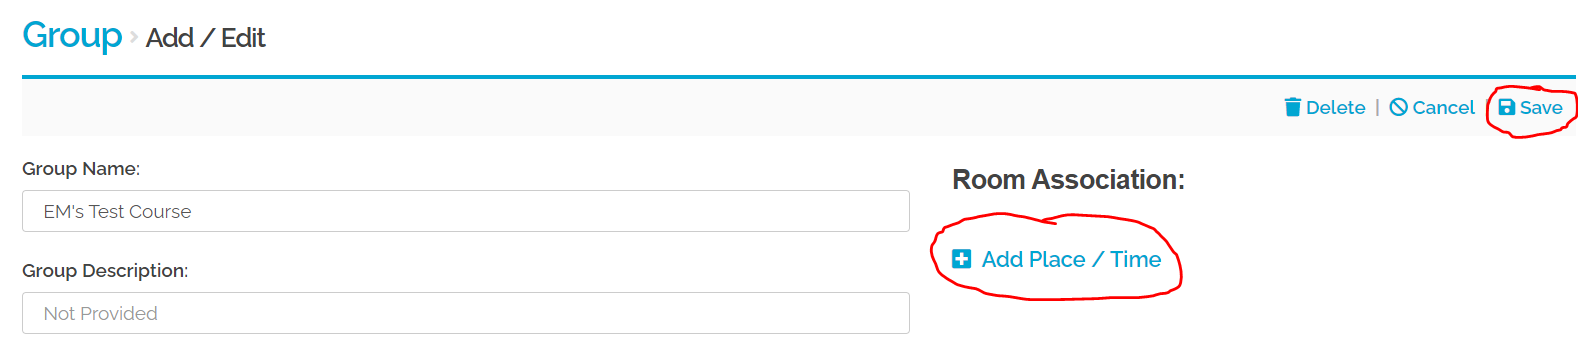
If you see the course in SeatGEN but don't see the options to create reports, seating charts, track attendance, etc., then it's likely that the course does not have a classroom association. This happens occasionally. Follow these steps to add the room association and afterward you’ll see all of the normal reporting options:
- Click the name of the course then click "Edit".
- Click "Add Place / Time" (as shown below).
- A dropdown list appears. Select the correct assigned classroom.
- Click "Save". The various reporting options will then appear.
Why are some photos or student profiles missing in SeatGEN?
If there are no photos for some students in SeatGEN, they likely did not upload a photo in SIS/ID Management so there's no photo available. If they're cross-registrants, it's possible our Canvas instance doesn't have permission to access those photos. In the unlikely event that there are many missing photos in SeatGEN and it appears something is wrong, please contact [email protected] for help and we'll investigate if needed.
If there is no background information for a student in the Profile Cards/Reports in SeatGEN, it's likely the student did not share this information within Campus Groups. Either they didn't enter any information, or they didn't opt in to share their profile. During orientation, new students are asked to share their background info in their Campus Groups profile. They must opt in to share their profile, for the info to feed into SeatGEN. MBA students are usually granted access to Campus Groups on the Tuesday or Wednesday during orientation. It may take a few days for them to take action and opt in. Professors may choose to ask their students to opt in and share their profile in Campus Groups, if they feel comfortable doing so, to help the professor get to know their students.